Typing Hash on a Mac Keyboard: A Step-by-Step Guide for Every Layout
Typing symbols may seem straightforward, but when switching between different computer brands or keyboard layouts, things can get tricky. One such example is finding and typing the hash on a Mac keyboard. This symbol, also known as the pound sign or number sign (#), is commonly used in coding, social media hashtags, and technical documents. In this guide, we’ll cover everything you need to know about typing the hash on a Mac keyboard, from layout differences to shortcuts and troubleshooting tips.
Why the Hash on a Mac Keyboard Confuses Users
Many users migrating from Windows to macOS struggle with symbols because Apple keyboard layouts differ depending on the region. While the hash on a Mac keyboard is easy to find on a U.S. layout, it’s hidden behind modifiers on UK and European keyboards. This difference can lead to confusion, particularly for users who frequently work with social media hashtags, coding, or documents that require this symbol.
Hash on a Mac Keyboard for U.S. English Layout
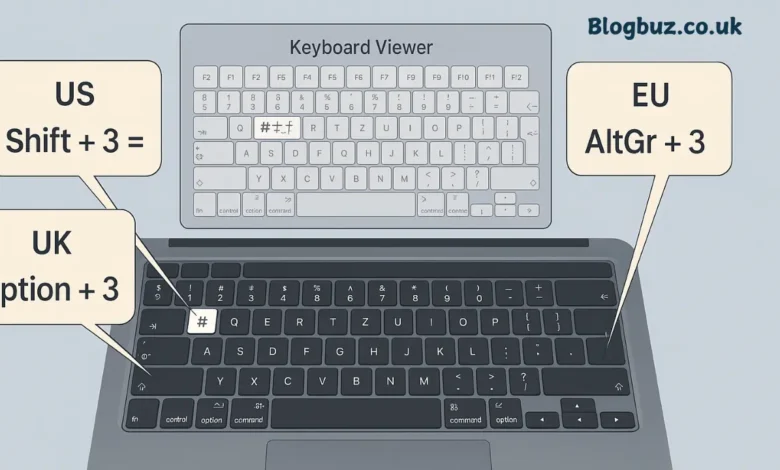
If you’re using a Mac with the U.S. English keyboard layout, typing the hash on a Mac keyboard is very simple.
- Press Shift + 3 to insert the number sign (#).
- The hash symbol is printed directly above the number 3, making it easy to locate.
This is the most straightforward layout and is what many online tutorials assume by default.
Hash on a Mac Keyboard for UK English Layout
For users in the UK, the process of typing the hash on a Mac keyboard is slightly different:
- Press Option (Alt) + 3 to generate #.
- On some UK keyboards, only the pound symbol (£) is visible above the number 3. The hash symbol is not printed, but the shortcut still works.
This is the most common source of confusion for British Mac users, as many expect Shift + 3 to work as it does on Windows keyboards.
Hash on a Mac Keyboard for European Layouts
The placement of the hash on a Mac keyboard also varies in European layouts:
- German keyboards – The hash symbol is typically located near the Return key.
- French keyboards – The hash may appear to the left of the number 1.
- Nordic keyboards (Norwegian, Swedish, Danish) – The symbol is usually placed on the three key, often requiring AltGr or Option modifiers.
- Italian keyboards – The hash is often found above the right Shift key.
Due to these differences, Apple recommends checking your current keyboard input source in System Preferences to determine the correct shortcut.
How to Use Keyboard Viewer for Hash on a Mac Keyboard
If you’re not sure where the hash on a Mac keyboard is located, you can use the built-in Keyboard Viewer tool:
- Go to System Preferences → Keyboard → Input Sources.
- Enable “Show Keyboard Viewer”.
- Click the input icon in your menu bar to display the virtual keyboard.
- Press modifier keys (Shift, Option, Command) to see where the hash symbol appears.
This is especially useful if you switch between multiple languages or layouts on the same Mac.
Alternative Methods to Type Hash on a Mac Keyboard
Sometimes, shortcuts don’t work as expected due to software glitches or incorrect input settings. Here are alternative methods to type the hash on a Mac keyboard:
Character Viewer
- Press Control + Command + Space to open the Emoji & Symbols panel.
- Search for “number sign” or # and insert it into your text.
Copy and Paste
- Copy # from another document or webpage and paste it.
- While not the most efficient method, it works in a pinch.
Custom Shortcuts
- You can construct a text replacement shortcut in System Preferences → Keyboard → Text.
- For example, type ## and have it automatically replaced with #.
Importance of the Hash on a Mac Keyboard in Daily Use
The hash on a Mac keyboard is more than just a symbol. It plays a vital role across different fields:
- Social Media: Used in hashtags on platforms like Twitter, Instagram, and TikTok.
- Programming & Coding: Common in languages such as Python, where # denotes comments.
- Technical Writing: Often used in Markdown formatting for headings.
- Telecommunications: Sometimes referred to as the “pound key” on telephones.
Due to its frequent use, mastering the hash on a Mac keyboard saves time and enhances workflow.
Troubleshooting Hash on a Mac Keyboard Issues
Sometimes users report that the hash on a Mac keyboard shortcut doesn’t work. Here are some fixes:
- Check Keyboard Layout: Go to System Preferences → Keyboard → Input Sources and confirm that the correct region (U.S., UK, German, etc.) is selected.
- Reset Modifier Keys: Misconfigured modifier keys can prevent shortcuts from working. Reset them under Keyboard → Modifier Keys.
- Test in Another App: Try typing # in Notes, TextEdit, or Safari to rule out app-specific issues.
- Update macOS: Outdated software can cause keyboard input glitches. Updating may fix the problem.
Comparison: Hash on a Mac Keyboard vs. Windows Keyboard
Windows and Mac keyboards differ significantly, which is why the hash on a Mac keyboard often puzzles new users:
- Windows (UK layout): The hash (#) is typed with Shift + 3.
- Mac (UK layout): Hash is typed with Option + 3.
- Windows (U.S. layout): The hash is also typed with Shift + 3, just like on Mac.
This inconsistency is one of the most significant pain points for people switching from Windows to Mac.
Tips for Remembering the Hash on a Mac Keyboard
If you frequently forget how to type the hash on a Mac keyboard, here are some tips:
- U.S. users: Remember “Shift 3 equals #.”
- UK users: Think “Option 3 equals #.”
- Use Stickers: Place a small sticker above the number 3 key if your layout doesn’t display the number.
- Muscle Memory Practice: Type hashtags daily until it becomes second nature.
Conclusion: Mastering the Hash on a Mac Keyboard
The hash on a Mac keyboard may be a small symbol, but it carries immense importance in modern communication, coding, and documentation. While U.S. layouts make it simple with Shift + 3, UK and European users must remember Option + 3 or other layout-specific shortcuts. Tools like the Keyboard Viewer and Character Viewer make it easier to locate and insert the symbol, while troubleshooting steps ensure you never get stuck without access to it.
You May Also Read: Start NixCoders.org Blog: Launching and Growing a Coding Blog