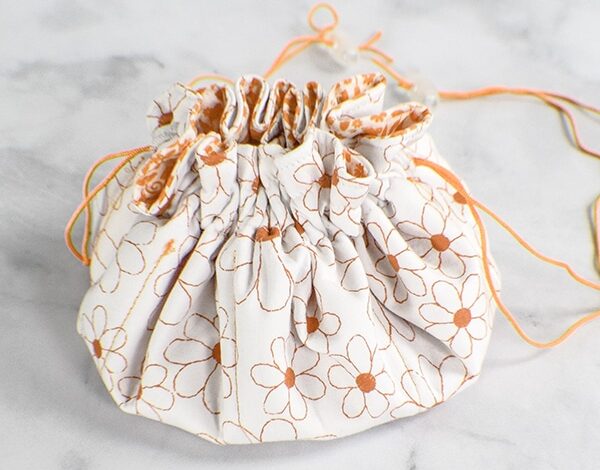
How to Make a Jewelry Pouch Drawstring

A drawstring jewelry pouch is a simple yet elegant way to store and protect your precious jewelry. It’s versatile, compact, and ideal for both travel and gifting. Crafting one yourself allows you to customize the design and size, making it a personal and thoughtful project. In this guide, we’ll walk you through how to make a DIY fabric jewelry organizer, the dimensions and patterns for a drawstring pouch, the tools and materials needed, and even how to turn it into a functional travel jewelry organizer. For professional solutions, custom jewelry pouches from PackAQ offer a premium alternative for retail, events, or corporate use.
DIY Fabric Jewelry Organizer
A DIY fabric jewelry organizer is an excellent project for anyone who loves crafting and appreciates functional accessories. It’s perfect for:
- Gifting: Add a handmade touch to your presents.
- Travel: Keep your jewelry safe and organized during trips.
- Retail Use: Display small jewelry items attractively.
Whether you’re a sewing novice or an experienced crafter, a drawstring jewelry pouch is a beginner-friendly project that doesn’t require advanced skills.
Drawstring Jewelry Pouch Dimensions
The size of your jewelry pouch depends on its intended use. Here are some recommended dimensions:
Small Jewelry Pouch (For Rings/Earrings):
- Fabric: 6×6 inches
- Finished Size: 4 inches in diameter
Medium Jewelry Pouch (For Necklaces/Bracelets):
- Fabric: 10×10 inches
- Finished Size: 6 inches in diameter
Large Jewelry Pouch (For Sets or Multiple Pieces):
- Fabric: 14×14 inches
- Finished Size: 10 inches in diameter
Choose your dimensions based on the amount and type of jewelry the pouch will hold.
Jewelry Pouch Pattern
To make a functional and attractive drawstring pouch, follow this simple pattern:
1. Circular Base Design
- The base of the pouch is a circle, which provides structure and stability.
- Use a circular object (like a plate or bowl) to trace the base onto your fabric.
2. Outer and Inner Layers
- For added protection, use two layers of fabric: one for the exterior and one for the lining.
- Ensure both circles are of equal size.
3. Drawstring Casing
- The casing is sewn near the top edge of the pouch.
- Leave a small gap for threading the drawstring through.
Materials & Tools
Materials:
- Fabric: Choose soft, durable materials such as velvet, satin, or cotton.
- Drawstring: Use ribbon, cord, or twine for the closure.
- Thread: Match the color of the fabric for a clean finish.
Tools:
- Scissors
- Sewing Machine (or needle for hand-sewing)
- Pins or Fabric Clips
- Ruler or Measuring Tape
- Safety Pin (for threading the drawstring)
- Iron (for pressing seams)
How to Make a Travel Jewelry Organizer
Follow these steps to create a practical and stylish travel jewelry organizer:
1. Cut the Fabric
- Cut two identical circles from your chosen fabric (one for the exterior and one for the lining).
- Optional: Cut smaller circles from padding material for added protection.
2. Sew the Layers Together
- Place the two fabric circles with their right sides facing each other.
- Sew around the edge, leaving a 1-inch gap for turning the fabric right-side out.
- Turn the fabric right-side out and press the edges flat with an iron.
3. Create the Drawstring Casing
- Sew a circular seam about 1 inch from the edge to create the casing.
- Leave a small opening in the casing for threading the drawstring.
4. Add the Drawstring
- Attach a safety pin to one end of the drawstring and thread it through the casing.
- Once the drawstring is threaded, pull both ends evenly and tie a knot to secure.
5. Customize and Finish
- Add decorative elements like beads, embroidery, or fabric paint.
- Test the pouch by placing jewelry inside and pulling the drawstring to close.
Tips for Making a Perfect Drawstring Jewelry Pouch
- Choose the Right Fabric: Opt for fabrics that are soft to prevent scratching and sturdy enough to hold their shape.
- Use High-Quality Drawstrings: Durable cords or ribbons ensure the pouch can withstand frequent use.
- Double the Layers: A lining layer adds durability and protects the jewelry from rough edges.
- Test the Closure: Before finishing, ensure the drawstring works smoothly and closes the pouch securely.
- Decorate Thoughtfully: Match embellishments to the occasion or intended use of the pouch.
Custom Jewelry Pouches from PackAQ
While making a drawstring jewelry pouch is a rewarding DIY project, PackAQ offers a premium solution for those who need professional-quality packaging. Custom jewelry pouches are ideal for retail, corporate events, and special occasions.
Why Choose PackAQ’s Custom Jewelry Pouches?
- Premium Materials: Crafted from luxurious fabrics like velvet, satin, and suede, these pouches protect and enhance your jewelry.
- Endless Customization: Add logos, patterns, or branding to reflect your personal or business style.
- Eco-Friendly Options: PackAQ is committed to sustainability, offering pouches made from recyclable materials.
- Versatile Uses: Suitable for gifting, retail packaging, or travel.
Professional Presentation
PackAQ’s pouches combine functionality with elegance, ensuring your jewelry is presented in the best possible light.
Conclusion
A drawstring jewelry pouch is a simple yet stylish way to organize and protect your jewelry. By choosing quality fabrics, following a straightforward pattern, and adding thoughtful details, you can create a pouch that’s both functional and beautiful.
For those who want professional-grade pouches, custom jewelry pouches from PackAQ are the perfect solution. With premium materials, extensive customization options, and eco-friendly practices, PackAQ ensures your jewelry is stored and presented with sophistication and care.
Ready to elevate your jewelry packaging? Contact PackAQ today to explore our collection of custom jewelry pouches and discover the perfect blend of style and functionality!


