Deck Prep Demystified: What Most Homeowners Miss Before Painting or Staining
A freshly painted or stained deck can dramatically improve the look and functionality of your outdoor space—but the quality of the final result depends far more on what happens before the first brushstroke. Proper deck preparation is one of the most overlooked steps in the painting and staining process, yet it’s the foundation of a finish that lasts.
While it’s tempting to dive straight into color selection and application, the truth is that skipping or rushing through prep work can lead to peeling, cracking, and uneven coverage down the line. Whether you’re hiring a painting company or tackling it yourself, knowing what proper deck prep really involves can save time, money, and frustration in the long run.
Let’s explore what most homeowners miss when prepping their deck, why each step matters, and how it all comes together to ensure long-lasting painting and staining results.
Why Deck Prep Is More Than Just Cleaning
A common misconception is that all you need to do is sweep off the leaves and hose down the boards before applying a new finish. While cleaning is an important step, it’s only one part of a much more detailed process. Proper deck preparation addresses moisture content, surface condition, and the compatibility of old and new coatings.
Wood, being a porous and organic material, reacts to the environment over time. It expands, contracts, absorbs moisture, and accumulates layers of grime, mold, and mildew. These conditions all impact how well paint or stain will bond to the surface.
Skipping prep might result in a good-looking deck—for a few months. But over time, poor adhesion leads to flaking, fading, or even structural damage that’s more expensive to fix than doing the prep work properly in the first place.
Step 1: Inspect for Damage
Before doing anything else, inspect the deck thoroughly. Look for soft spots, splintering boards, popped nails, and any signs of rot or decay. These issues must be addressed before painting or staining.
Loose boards or nails should be secured. Damaged wood should be replaced, not covered over. Applying finish to compromised surfaces only masks the problem temporarily and could create safety hazards later.
A professional painting company will always begin with a structural check to ensure the deck is sound and that any finish applied will have a reliable base.
Step 2: Deep Cleaning
Even if a deck looks clean, there’s likely invisible buildup—dirt, pollen, algae, and old product residue. These all interfere with the ability of a stain or paint to adhere properly.
Deep cleaning involves more than a rinse. A specialized deck cleaner, often formulated to remove mold and lift embedded grime, should be applied with a scrub brush or low-pressure sprayer. For older coatings, a product-specific stripper may be needed to break down stubborn layers.
After cleaning, it’s important to rinse the deck thoroughly and allow it to dry completely. This drying process can take 24 to 48 hours, depending on weather conditions. Painting or staining a wet deck is one of the most common causes of finish failure.
Step 3: Sanding for Smoothness and Absorption
Once the deck is dry, sanding becomes the next essential step. This smooths out rough spots, removes splinters, and opens up the wood grain to better absorb stain or paint.
Focus especially on horizontal surfaces like railings and deck boards where foot traffic and exposure are highest. Edges and corners may also need extra attention if they’re worn down or peeling.
Sanding not only improves adhesion but also gives the final finish a more uniform appearance. It’s one of the easiest ways to elevate the overall look and feel of the deck before applying any product.
Step 4: Checking Moisture Content
This step is often skipped, but it’s critical—especially for staining. Wood that’s too wet can trap moisture under the coating, leading to blistering or mold growth. On the other hand, overly dry wood may absorb stain unevenly or too deeply, wasting product and creating blotchy results.
Ideally, wood moisture should be below 15% before staining. Moisture meters, which are inexpensive and easy to use, help ensure the timing is right. This step is particularly important after rain, power washing, or high-humidity weather.
A knowledgeable painting company will always verify moisture levels before proceeding, especially when deck staining in Columbus is the primary goal of the project.
Step 5: Masking and Protecting
Before opening any paint or stain can, take time to protect the surrounding areas. Use painter’s tape and plastic sheeting to cover siding, nearby plants, furniture, and walkways.
This prevents overspray or drips from causing unintended stains and keeps the workspace clean and manageable. It also allows for faster application, knowing that you’re free to focus on the task without worrying about cleanup afterward.
Professionals know that the preparation perimeter is just as important as the surface itself. A protected workspace leads to cleaner lines and fewer errors.
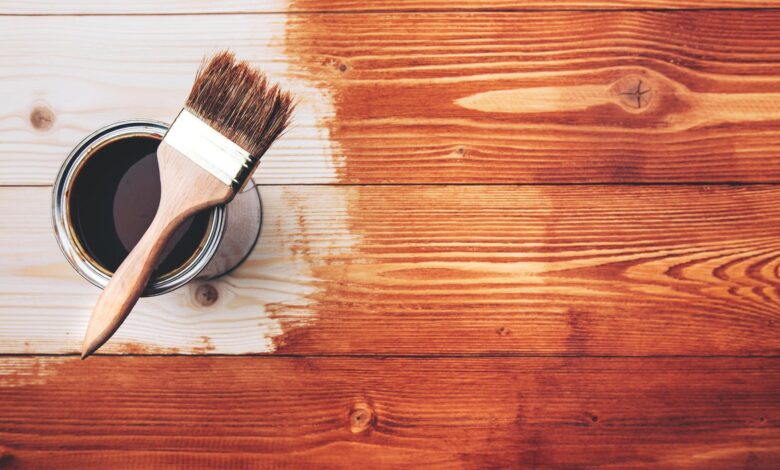
Step 6: Choosing the Right Finish
Now that the deck is prepped and ready, the choice of product becomes the final part of the preparation. Paint and stain are both valid options, but they behave differently.
Paint sits on top of the surface and forms a hard, opaque shell. It offers great UV protection and color consistency, but it’s more prone to peeling if the surface isn’t perfectly prepped.
Staining, on the other hand, penetrates the wood and allows the grain to show through. It comes in transparent, semi-transparent, and solid formulas. Stains are more forgiving on slightly weathered wood and typically easier to touch up down the line.
The key is selecting a finish that matches your wood condition, local climate, and desired maintenance level.
Green Diamond Painting often helps homeowners weigh these factors when deciding whether painting or staining is the better route for their specific deck and lifestyle.
Step 7: Timing and Weather
Even with all the prep done, timing your application matters. Paint or stain should be applied in mild temperatures—generally between 50°F and 85°F—with low humidity and no forecasted rain for at least 24 hours.
Applying product in poor weather conditions is one of the quickest ways to undo all your careful prep. The coating may not cure correctly, leading to bubbles, tackiness, or uneven coloring.
Check the forecast before scheduling your project, or better yet, rely on professionals who know how to work around regional weather patterns to get optimal results.
Final Thoughts
Deck prep isn’t glamorous, but it’s essential. Whether you’re repainting a weathered deck or applying fresh stain to a new one, success begins long before the finish is applied. Skipping steps like inspection, deep cleaning, sanding, and moisture checks might save time initially—but it can cost more in the long run through repairs, re-dos, and frustration.
Understanding the science and sequence behind surface prep empowers homeowners to protect their investment and achieve beautiful, lasting results. A trusted painting company like Green Diamond Painting brings not just technical expertise, but a step-by-step process that ensures your deck looks great and performs even better.