The Complete FRP Tank Nozzle Repair Guide: Step-by-Step Process Used by US Industrial Tank Specialists
Fiberglass reinforced plastic tanks are found across water treatment facilities, chemical processing plants, agricultural operations, and industrial manufacturing sites throughout the United States. They are valued for their corrosion resistance, structural durability, and relatively low maintenance requirements over long service lives. But like any engineered system, they have components that experience wear, stress, and failure over time — and nozzles are among the most vulnerable of those components.
A nozzle is the point where a tank connects to piping, pumps, valves, and process lines. It is the interface between the contained fluid and the broader system it serves. That makes nozzle integrity directly tied to operational continuity. When a nozzle begins to fail — through cracking, delamination, chemical erosion, or mechanical stress — the consequences extend beyond a single fitting. Leaks at nozzle junctions can compromise containment, contaminate surrounding systems, and require unplanned shutdowns that affect production schedules and regulatory compliance.
Understanding how nozzle repair is actually performed, and what decisions shape a successful outcome, helps facility managers, maintenance engineers, and procurement teams make more informed choices before problems escalate.
What FRP Tank Nozzle Repair Actually Involves
FRP tank nozzle repair is a structural restoration process, not simply a patch or a seal. The goal is to return the nozzle connection to a condition that meets the original design intent — in terms of load-bearing capacity, chemical resistance, and leak-tight integrity. This requires working within the material properties of fiberglass reinforced plastic, which behaves differently from metal and demands a process-specific approach.
For anyone involved in maintaining industrial tanks, reviewing a credible Frp Tank Nozzle Repair guide is a useful starting point for understanding what a proper repair sequence looks like and what conditions must be met for the work to hold long-term.
FRP is a laminated composite. Its strength comes from the orientation and bonding of glass fiber layers within a resin matrix. When a nozzle is damaged, that laminate structure is disrupted at or near the junction point. Repair means rebuilding that structure — not just filling a void or applying a surface coating. The distinction matters because a repair that only addresses surface appearance without restoring laminate continuity will fail under operating pressure or thermal cycling.
Why Nozzles Are Structurally Vulnerable
Nozzles represent a transition point in the tank wall. The main shell of a tank is a continuous laminate, uniform in structure across its surface. A nozzle introduces a penetration through that shell, and the connection between the nozzle fitting and the tank wall must be bonded and reinforced to compensate for the interruption in structural continuity.
This connection point experiences stresses that the main shell does not. Piping systems exert weight loads, thermal expansion forces, and vibration directly onto nozzle fittings. If the piping is not properly supported, or if the system undergoes frequent temperature changes, those forces accumulate at the nozzle-to-shell junction over time. This is why frp tank nozzle repair is not an uncommon maintenance requirement even in well-managed facilities — the physics of the connection make it a predictable wear point.
Identifying Damage Before Repair Begins
Accurate damage assessment determines the scope and method of any repair. Beginning work without a clear understanding of what is damaged, how deeply, and over what area is one of the primary reasons repair work fails prematurely. FRP damage is not always visible at the surface, and what appears to be a small crack can indicate more extensive subsurface delamination.
Surface vs. Subsurface Damage
Surface damage — hairline cracks in the gel coat or resin-rich exterior layer — is relatively straightforward to address. It often results from impact, thermal shock, or UV degradation over time. However, the more consequential damage type is subsurface delamination, where fiber layers have separated from each other or from the resin matrix beneath a surface that may still appear intact.
Technicians typically use tap testing to identify delaminated areas. A dull or hollow sound when tapping the laminate surface indicates separation beneath. This low-technology method remains effective and widely used in field conditions. In more complex cases, ultrasonic testing provides a more precise picture of laminate integrity without requiring surface removal.
Chemical Degradation at Nozzle Junctions
In chemical storage and process tanks, nozzle areas are also subject to chemical attack that can weaken the resin matrix over time. Depending on what the tank contains, the resin may absorb trace amounts of the stored fluid, leading to blistering, softening, or fiber-matrix separation. This type of degradation often advances slowly and without obvious visual signs until the damage is already significant.
A thorough pre-repair assessment should include a review of the tank’s service history, the fluid it contains, and whether the original laminate specification was appropriate for that fluid. In cases where the nozzle repair is being performed on a tank that has been in continuous chemical service, this context affects both the repair method and the choice of resin system used in the restoration work.
The Step-by-Step Repair Process
Proper frp tank nozzle repair follows a defined sequence. Skipping or rushing any step introduces risk, because each phase of the process prepares the surface and structure for the next. The repair is only as reliable as its weakest preparation stage.
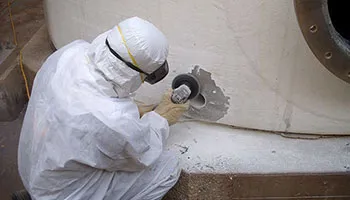
Surface Preparation and Material Removal
The first physical step is removing all damaged material from the repair zone. This means grinding back to sound laminate — past the visible damage, past any discoloration or softness in the resin, and into material that is structurally intact. The grinding perimeter must extend beyond the identified damage area to ensure the repair bond is made to undamaged substrate.
This step is often more extensive than it initially appears. What looks like a small crack at the surface frequently requires a larger footprint of material removal once the outer layers are ground away and subsurface conditions are exposed. Surface preparation also includes solvent wiping to remove grinding residue, oils, and any contamination that would interfere with adhesion.
Laminate Rebuilding and Hand Layup
Once the surface is properly prepared, the repair laminate is applied in layers. This is hand layup work — each layer of glass reinforcement is saturated with catalyzed resin and applied progressively to rebuild the laminate thickness and structural profile of the original nozzle connection. The fiber orientation in each layer is deliberate, matching the load-bearing design of the original construction where possible.
Each layer must be fully wetted out and consolidated before the next is applied. Air voids trapped between layers become stress concentrations that reduce the long-term integrity of the repair. This is skilled manual work, and the quality of execution has a direct relationship with how the repair performs under service conditions.
Curing Conditions and Their Importance
FRP laminates require adequate cure time before the repaired area is returned to service. According to guidance from ASTM standards for reinforced plastic materials, cure conditions — including temperature, humidity, and air circulation — affect the degree of cross-linking in the resin matrix and, therefore, the final mechanical and chemical resistance properties of the cured laminate.
In field conditions, cure times are sometimes shortened due to operational pressure to return the tank to service. This is a common cause of premature repair failure. A repair laminate that has not fully cured may appear complete but will have reduced strength and chemical resistance compared to a properly cured repair. Post-cure heat application can accelerate the process when ambient conditions are not ideal, but this must be managed carefully to avoid introducing thermal stress into the laminate.
Resin Selection and Chemical Compatibility
The resin used in a nozzle repair must be compatible with both the original tank laminate and the service fluid the tank contains. Applying a repair using a resin system that was not selected for the specific chemical environment can result in a repair that performs adequately in mechanical terms but degrades rapidly when exposed to the stored fluid.
This is a common oversight in general maintenance environments where standard repair materials are used without reference to the original tank specification. For tanks in chemical service, the repair resin should be specified by someone familiar with the chemical resistance requirements of the application — not simply matched to what is available on-site.
• Vinyl ester resins offer broad chemical resistance and are commonly used in aggressive service environments where the original tank was similarly specified.
• Isophthalic polyester resins are appropriate for moderate chemical exposure and general water service tanks where high-end chemical resistance is not required.
• Epoxy resin systems are used in specific high-performance applications but require careful surface preparation and compatible substrate conditions.
Post-Repair Inspection and Return to Service
A completed frp tank nozzle repair should be inspected before the tank is returned to service. This includes a visual inspection of the repaired area for surface defects, a tap test to check for delamination within the new laminate, and a review of the nozzle geometry to confirm that the fitting alignment and connection integrity are within acceptable limits.
For tanks that hold regulated substances or operate under pressure, a hydrostatic or pressure test may be required to confirm that the repaired connection is leak-tight under operating conditions. This step is not optional in regulated environments, and documentation of the test result is typically required for compliance records.
The return-to-service decision should also consider the broader condition of the tank. If a nozzle has failed or required significant repair, it is worth evaluating whether adjacent nozzles or areas of the shell show early signs of similar stress or degradation. Addressing developing issues at the time of a scheduled repair is substantially less costly than managing a second unplanned shutdown.
Concluding Thoughts on Nozzle Repair as a Maintenance Practice
FRP tank nozzle repair is a well-established industrial maintenance procedure, but it is one that depends heavily on correct execution. The material science of fiberglass reinforced plastic does not allow shortcuts — damage must be fully removed, the laminate must be properly rebuilt, and cure conditions must be managed for the repair to perform reliably.
For facility managers and maintenance teams, the key is treating nozzle repair as a structural process rather than a routine fix. That means involving technicians with FRP-specific experience, using resin systems that are matched to the service environment, and not returning a repaired tank to service before the repair has reached full cure.
When approached correctly, a well-executed nozzle repair extends the service life of the tank, maintains system containment integrity, and reduces the risk of unplanned failures that carry operational and regulatory consequences. The investment in doing the repair properly the first time consistently outweighs the cost of repeated interventions on the same connection point.